Pages

Tuesday, January 18, 2011

FINAL SUMMATIVE

All of a sudden..... Ronald Mcdonald became president

Original image (courtesy of google images)
First Seven Minutes


Next Five Minutes


Next Ten Minutes


Next Twelve Minutes


Last Twenty Minutes


Wednesday, January 12, 2011

Impossible Reality

FINISHED PRODUCT


To start this assignment, I knew immediately that I wanted to have a "banana gun" as my impossible reality so I started by having a digital photo of myself taken; I chose to do a similar pose to that of Agent Smith in the Matrix where he fires his pistol at Neo in the subway station (a classic!). I then uploaded the image of myself onto the computer and soon began my work on Adobe Photoshop Elements 5.0.

First 10 Minutes

Over the course of the next 10 minutes, I started to morph my banana into a "banana revolver". To do this I first uploaded an image of a revolver from google images, diminished the size (I clicked Image, Resize, Resample Image, Constrain Proportions and then changed the width and length pixels) and rotated the image left; done by clicking image, rotate, custom, left and choosing the desired number of degrees in that direction. The image needed to be rotated since the banana is circular as opposed to the revolver, which is straight; the extremely annoying part of doing this was to get the revolver image to the desired angle, this took roughly 6 tries before getting it right. I then used the clone/stamp tool to photoshop various parts of the gun onto my banana to make it look more like an actual revolver (the cylinder, trigger and hammer of the gun). Lastly, I made the image of Agent Smith smaller and clone/stamped the gunfire blasts onto the end of my revolver to make the scene much more dramatic and action-packed.


A difficult part of the assignment was determining what kind of scene I wanted to place myself into and who I wanted to be firing my banana at; at first I thought about simply cropping Agent Smith out of the picture and placing myself into the scene but I thought to myself that it would be way too easy and I needed an actual challenge. After about 20-30 minutes of thinking and surfing Google Images endlessly, I decided I would place myself into the scene of a destroyed/desolated street in the middle of nowhere fighting off a unit of marines single handedly with a banana with the army cowaring behind a destroyed car.

Next 20 Minutes

During the next 20 minutes, I resized/made smaller the destroyed car and used the clone/stamp tool to place it into the scene of the desolate street to the right at the front of the picture. Placing the wrecked car into the background was a simple task due to the fact that it fit in so well because the road and car are virtually the same colour and both images display the same feeling of destruction; almost as though it were the scene of an urban warfare. The next thing I did was resize the image of the soldiers so they could fit at the front of the picture right behind the destroyed car once again, using the the clone/stamp tool. The only issue was making sure that I didn't merge any of the wooden wall (background in the picture of the soldiers) with the destroyed car. To avoid this problem, I used a smaller brush size for the clone/stamp tool when I got to areas such as the helmets, shoulders and guns, and also paid a great amount of attention to the detail. In my opinion, the one main criticism I had with the picture was the fact that I could not fit more soldiers into the scene. Another problem I had was thinking where I would fit myself and my banana into the image; the only probable area was at the far left side of the scene because that is where the soldier was pointing his gun at (but then why are they hiding behind a destroyed car?). 


Next 7 Minutes

It soon also came to my attention that the photo I took of myself cut my legs out, that being said I would not be able to place myself anywhere in the picture and would either have to take another photo of myself with a digital camera or work with an entire new medium (meaning all this work would be for nothing!). The only possible solution to this problem that I could currently think of would be to upload a picture of a random guy's legs from Google Images and attach them onto the bottom half of my body; I would have to match the colour of the legs with the upper half of me to create continuation and make the picture look like it wasn't photoshopped. I found and uploaded an image from the Internet of a robocop-ish character and cropped it using the crop tool so that only his legs and feet were present in the photo. I then dragged the image, placed it onto my picture and resized the legs and waist so it could fit onto my body (as seen above on the left side). I was personally disgusted that I had to lower myself to this level, as I knew no matter what I did, the picture would never look genuine enough as I wanted it to look (anyone would be able to tell that below the waist is a different image).

Next 10 Minutes

To me, it just looked plain weird the way I had attached "Robocop's" legs bellow my waist; even though I got the legs to fit perfectly, they differentiated too much in the colour and in the style of apparel I was wearing. In an attempt to make the styles and colours of my pants and shirt to match, I merely selected the image that I placed of the man's legs, selected enhance, then adjust lighting and then brightness/contrast and made the area darker in order to match the top half of myself. Next, I merged both images (lower half of body with the main image) so that I could use the clone/stamp tool to crop out any white areas outlining my figure in the picture; again, to do this properly, I used a very small brush size for the clone/stamp tool to properly blend myself with the background. Somehow I still felt the image was lacking in its dignity so I uploaded a picture from Google Images of what happens to the second Terminator once he gets shot (bullets turn into spiral tin foil plates or something) and resized/make smaller the image so I could use the clone/stamp tool to duplicate the bullets onto myself (to make me indestructable). I also edited the image to show the soldier at the front shooting at me. All in all, I was only somewhat pleased with the result of my "Impossible Reality" project but disliked the fact that my banana doesn't seem to be pointing at anyone in particular and the fact that the car was really just placed into the image for no particular reason.

aNdReS mElEnDeZ


Monday, January 10, 2011

Movie Poster

Before starting to work on this assignment, I knew exactly what movie I wanted to take the lead role in...THE TERMINATOR. To start, I simply looked at the pose Schwarzenegger was in on the cover of the first Terminator and just mimicked that pose (minus the gun and black leather jacket), only I was alot less "badass" about it. I had a photo taken in this pose with a digital camera and uploaded the image onto the computer and soon began my work on Photoshop Elements again.

First Fifteen Minutes

After opening the image of myself on Photoshop Elements but still before using the clone/stamp tool, I had found and uploaded an original cover of The Terminator from Google Images. Just so that I could properly use the clone/stamp tool, I needed to resize the image of myself (digital photo images are generally too large!); to resize the image I clicked Image, Resize, Resample Image, Constrain Proportions and then changed the width and length (pixels) to match the dimensions of the other photo (The Terminator movie cover). To start, I had blackened my shades entirely by using the clone/stamp tool (cloning and stamping pitch black areas throughout) in order to make sure that my eyes were not visible. I then cloned the reddish light being emitted by Schwarzenegger's right eye and stamped/placed it onto my right eye. I then used the clone/stamp tool to photoshop the gun that Schwarzenegger was holding onto my right hand; the only challenging part of this task was to stamp the area around the trigger onto the picture so that my finger fit perfectly through the loop (For this I needed a really small brush size and to pay close attention to the details).

Next Seven Minutes

While working on the cover, I thought to myself that I would need to spice things up at some point and let people know my true identity (That I am in fact part man, part cybernetic organism), that being said I uploaded an alternate cover of The Terminator from Google Images; the one that shows half of Arnold's face covered in metal machinery. Again, I resized this image so that it could be compatible with the image of myself and then began to clone/stamp areas of metal from Arnold's face onto the left side of my face and neck, as well as overtop the lens covering my left eye. 

Next Ten Minutes
Now that I was finished morphing myself into the terminator, I opened a separate file that mimicked roughly the exact same dimensions of the actual Terminator movie cover. Using the paint bucket tool, I filled the entire portrait a pitch black colour. In order to fit the previous image of myself holding the gun into the new page, I again had to alter the dimensions slightly; only this time since the picture of myself was too wide, I had to unselect constrain proportions so that I could narrow the image (diminish width without diminishing length too) and thus fit myself into the cover. I then used the clone/stamp tool to clone the movie title, credits and critical praise onto the bottom third of the picture and added the lasers seen on the right side of the cover as well. Also, since I couldn't quite recreate the old-looking 1970's photographic feel to the original cover, I tried my best to still somehow visually distort the picture; I selected effects and artistic and decided to use paint daubs to give a bit of a nostalgic feel. My one regret is that my body does not cover more of the background like in the original movie cover so I would be left with a great amount of negative space present in my version. 

Next Fifteen Minutes
The most difficult aspect of all in constructing this movie cover was to recreate the lasers seen on the left of the cover. I began by using the clone/stamp tool to clone the various laser segments seen on the left of Arnold Schwarzenegger's gun and stamping it onto the same area of my own cover. The main problem with my my movie cover picture was the fact that there was such a great distance between the gun I am holding/my hand and the rest of my body (unlike on the actual movie cover); which meant that more of the lasers would have to be visible on my version of the cover. To complete the lasers, i had to use a very small brush size to clone the area of laser seen on the left side of the gun and stamp it onto the right side of the gun while keeping consistent with the diagonal direction it is running in, this process was quite time consuming for me as I had to pay great attention to the detail and make sure the laser ran in a perfectly straight line.

Last Ten Minutes

Personally, I had no clue where the end of the gun I was holding was located (In the original cover it is rather ambiguous what is the gun and what is Arnold's jacket) so I simply took a guess and clone/stamped the black background onto the bottom area and photoshopped the lasers along this area (as seen above) using the clone/stamp tool (same process as explained in the previous step). The last step I had was to place my name (the starring actor in the film) on the poster, which I did at the very top of the poster. To place the text, I used the horizon type tool and chose Impact as my font for the text (I didn't know exactly what font was used in the original poster). Overall, I was relatively pleased with the outcome of my efforts on this assignment but was rather displeased with the great amount of negative space present (which to me gave a plain and slightly boring look), the lack of lasers in the cover and also the fact that unlike on the original, my body is simply cut-off at the bottom of the cover (rather then the area being darkened to blend in with the overall image). That is all.

- aNdReS mElEnDez


Friday, January 7, 2011

"Forrest Gump"

For this assignment, as usual I wanted to go for a more humorous approach so I thought the best way to go about doing this would be to put myself into a family portrait of a family where I clearly didn't belong. I decided that I would photoshop myself (A 2000's kid) into a family from the 70's. To start this assignment, I first found an image of an American family from the 1970's from Google Images that I could photoshop myself into. Since I thought I would take the mother's spot in this photo, I had a picture of myself taken with a digital camera with my right arm intending to pat my husband's right shoulder and my left hand holding the child with the red ribbon in front of me. After four takes, I decided the above photo of myself would be the best one to use, so I then uploaded the photo (along with the American family) onto Photoshop Elements

First 20 minutes
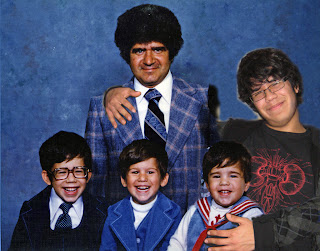
Once I uploaded both images onto Photoshop Elements, I then had to greatly decrease the width and length of the photo of myself in order to fit myself into the American family portrait; to resize the image I clicked Image, Resize, Resample Image, Constrain Proportions and then changed the width and length (pixels) to match the dimensions of the other photo. Before I photoshopped myself into the image, I had first used the clone/stamp tool to erase the mother from the photo by cloning parts of the blue wall in the background and stamping the segments over her. After this, I added myself into the image by first cloning my right hand and stamping the it onto the father's right shoulder, I then began to add the rest of myself into the photo by stamping various parts. However, the first time stamping myself into the picture, my left hand did not lie exactly where I wanted it to (my left hand was too much to the right of the photo) so I had to reclone and stamp my left arm and hand into the photo so that I was properly holding the child and the photo looked more believable. Considering the flaws of my photoshopping skills, I was rather disappointed with my work on my right hand lying on the man's right shoulder due to the fact that to me, it appeared to be ingenuine; It looks as if there is only a hand lying on his shoulder due to the fact that a sleeve is not visible and because most people don't have there hands lying as low as mine when patting someones shoulder. That being said, I still found the overall task of placing myself into the photo to be quite easy and hardly time-consuming because I was already in a pose that could match that of the photo easily so everything could fall into place. All I was left with now was just to complete the man's left shoulder and get rid of any beige areas around my head.

Five Minutes Later
In the mere course of five minutes I began to complete the man's left shoulder by cloning various parts of his jacket and stamping it onto his shoulder with the clone/stamp tool, though I had to be careful that I stayed consistent with the stripped square pattern on the man's jacket by keeping the white in a line and the blue in a square shape. I had also started my work om erasing the beige areas seen around my head that appeared from the other photo of myself in the pose (the colour of the wall in the background); again, this was accomplished by cloning areas from the blue coloured wall and stamping it onto the beige areas using a very small brush size for the clone/stamp tool.

Eight Minutes Later
The next eight minutes was merely just a continuation of my previous efforts of attempting to complete the left side of the man's jacket and erasing the beige areas encircling my head.  The latter I now finished my work on and proved to be a relatively easy task but required me to be rather anal about generally as I had to make sure I didn't stamp any of the blue wall into my hair.  

Next 15 Minutes
I had continued to complete the jacket and also lightened the darker areas seen on the middle-left side of the jacket by cloning and stamping other lighter areas of the man's jacket onto the darker ones. I had greatly disliked the appearance of the darker areas in the man's jacket because to me, they looked more like oil stains in the fabric rather than actual shadows projected by the other family members in front of him, so I decided to fix this. While trying to finish the left side of the man's jacket I had ran into somewhat of a dilemma; I had a hard time trying to decide how I would differentiate where the shoulder-blade of the jacket would end and where the arm sleeve would begin; on the man's right arm; there appears to be a thin diagonal line running along between the areas of the man's arm and shoulder. The problem was that I could not merely duplicate the diagonal line onto the man's other side with the clone/stamp tool due to the fact that the diagonal line would have to run in an opposite direction to look realistic and anatomically correct too. The process proved to be ever so long and gratuitous as I was forced to clone a single black pixel from the already-existent diagonal line (on the man's right side) using the smallest brush size and from there create a new diagonal line by constantly cloning/stamping this single black pixel. In the end, the efforts were worth the wait because now the image looked somewhat genuine. At this point all I was left to do was to create the man's left arm and finish his jacket.

Next Ten Minutes (The End Result!)
In the next ten minutes I had finally finished using the clone/stamp tool to recreate the man's flannel jacket, as well as his arm and thus, finished my work on the entire image. On a critical note, I was really proud of my work on this picture, for the most part I had achieved my goal of making myself belong in the family photo. I especially liked the fact that I was able to fit so well into the image with my pose with little editing or rearrangements of my body parts (with the exception of my left arm and hand). I was also proud of my relative success with recreating the dude's left arm using only one black pixel (seeing as how I thought it would be an impossible endeavor at first); overall, the left arm looked believable in the photo just aside from the fact that his left shoulder looked slightly larger than his right shoulder. However, I wasn't exactly please with the way both my hands turned out in the photo; as mentioned earlier, my right hand appears to have no sleeve or wrist for that matter. As well, I recognize that I could have added visible shadows projected by both my hands in order to make the photo more life-like. Lastly, I also feel that my left hand and wrist should have slid underneath the child's left arm to look more realistic because I have personally never seen anyone hold their child the way I am in a photo. That is all, cheers!

Friday, December 10, 2010

My zoomorphic Self


STEP #1 - 30 minutes

I knew that if I was to be an animal,  I wanted to be  one of the most viscous and feared animals that ever lived. That being said, I found two images of barking dogs from Google Images that I wanted to use at some point in the Photoshop process to merge with my own face. Both images were close-ups of ferocious canine in a barking pose.

The first thing I did before starting my work on Photoshop was to obtain photos of myself (using a digital camera) in a primitive canine-like pose as if I were breathing fire. Right from the start I had decided that there was no real animal that I would like to morph into but rather some kind of demonic ,make-belief creature and immediately, a two (or three) headed dog came to mind, I would have morphed myself into a two-headed dragon but I couldn't merge myself with a dragon since dragons aren't real but dogs are.

I then uploaded both images of myself onto Photoshop using a USB connector and soon began my work on creating my zoomorphic self, When I first started to use Photoshop  Elements, I used the clone/stamp tool to merge my face with the faces of the German Sheppard and the vicious brown dog (right). I had encountered a couple of problems when trying to match the dogs' faces with my pose due to my positioning; on the right the dog's nose and open jaw are facing a different direction than my eyes thus giving the illusion that my glasses are crooked. On the left, a problem I faced was that the dog's mouth was too long to be photoshopped onto my face without looking unnatural  and awkward on my face, to solve this problem I only merged the dog's nose and part of it's mouth onto my face.


STEP #2 - 10 minutes

I obtained an picture of a pitbull from Google Images in a regular pose, I immediately erased the head of the pitbull by cloning and stamping the background to cover up the dog's head. In order to properly fit my two heads onto the body of the pitbull, I needed to greatly diminish the sizes of my two poses since images from a digital camera usually have more pixels than those from the internet. To resize an image, you select the following; "image - resize - resample image", then choose how many pixels you want the picture to be made of (length and width). Using the clone/stamp tool, I had then made an attempt at merging my two heads (resized) onto the body of the pitbull. However, I was never satisfied fully with the result of my work since my heads looked too small and relatively disproportionate to the rest of my new body. The two dog heads also look of varying size; the head on the right looks quite smaller than the other head. The other problem with the photo is that the color is not uniform since the dog's head on the left is light brown and black since it is a German Shepperd, the other dog head is dark brown and the pitbull's body is white and dark grey.

STEP #3 - 15 minutes
I now tried to make the color of the dog uniform (grey) by cloning sections of fur from the front leg (on the left) and stamping the sections onto the dog's left face, the right dog's face already looked grayish so I left it alone. I wanted to clone/stamp some of the dog's white fur onto the faces to look more genuine but it would take too much time and I didn't know where to start. The other part of the photo that I was not currently satisfied with was the ears of the dog; one of the ears was light pink colored and the other was dark brown causing inconsistency in .color

STEP #4 - 6 minutes
Although seemingly unimportant, I had the idea that I would make myself a domesticated dog (The one you take for a walk and feed), so I decided to derive two images of dogs wearing collars from Google Images (one of the images is on the right, I can't find the other), resize both images and photoshop the two dog collars onto both of my necks using the clone/stamp tool. The task was a very short and simple one.

STEP #5 - 25 minutes


For the finale, I had uploaded a photo of a girl and her granddaddy taking the family dog fro a walk on a warm, brisk, summer morning (Google Images). I knew that they were in need of a much feistier and cooler dog so I photoshopped myself where the previous dog was walking. The process was a difficult one since I had to greatly diminish the size of the previous picture (my zoomorphic self) so it could fit realistically into the new image; the end result may look slightly unrealistic since I had to simultaneously resize my body and still make myself the focal point of attention. As well, I had to stamp the image of myself with a low pixel number (clone/stamp tool) and with extreme precision so that I only photoshopped myself and not any of the grass or surroundings  into the new image. When I finally finished photoshopping myself into the new scene, I thought the picture was still a little dull and needed one thing to be completed...fire. I then found and saved an image of a massive flamethrower flame from google images and used the clone/stamp tool to give the illusion that I could breathe fire from the mouth. All in all, aside from the slight variation of color in my fur and ears, as well as the slight size variation of my two heads and the overall slight fakeness of the image, I'd say I'm generally pleased with the overall result of my efforts.